
Intro
In a previous blog post, I had benchmarked a few EDR software vendors & selected the one that suited my organisation best: CarbonBlack. With the contractual details sorted out, it was time to deploy the agent to my organisation’s fleet of workstation.
Had I wanted to deploy CarbonBlack with the Jamf MDM, it would have taken me a few hours of reading the fancy manuals to set everything up. However, my organisation uses Kandji to manage its Macs, and at the time of writing, VMware did not have any documentation for this specific usecase.
I went through the debugging process so you don’t have to. Strap in, it’s tedious but not very hard.
Disclaimer
If you take a look at the Installing Mac OS Sensors on Endpoints page on the VMware documentation website, you’ll see multiple sections describing additional steps depending on your Mac OS version.
This guide focuses on Mac OS 12 & above.
The how-to
Successfully deploying the CarbonBlack agent on Mac takes a bit more effort than copying an .app file to the Applications folder.
An EDR is an intrusive bit of software, and we will need to prepare our target Mac OS devices with the right configuration profiles for the agent to run as intended.
More specifically, we will need to create 3 configuration profiles on Kandji. To add a profile on Kandji, go to Library > Add new, and search for the type of profile you need.
Let’s get started.
System extension profile
ℹ️ Description
This system extension allows the CarbonBlack agent to operate in user space, while still being able to carry out “privileged” actions.
📃 VMware docs reference page:
Approve the System Extension via MDM
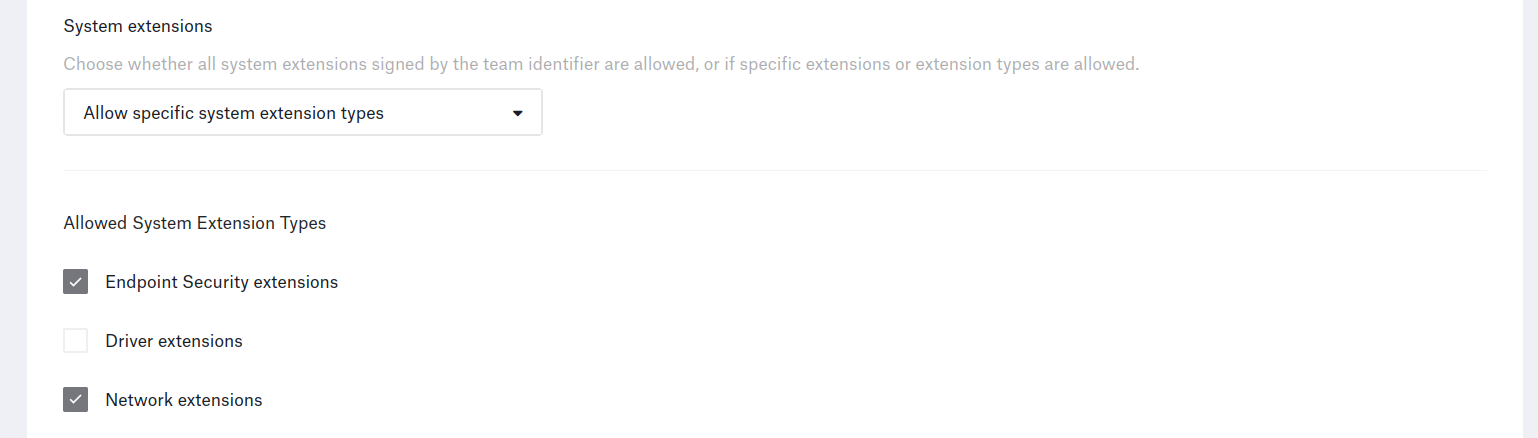
🐝 Kandji configuration
From the Library page, add a System Extension Profile, and fill it out with the information provided by the VMware documentation website.

Network extension profile
ℹ️ Description
CarbonBlack’s device quarantine feature depends on this extension to manage & block network traffic on the device.
📃 VMware docs reference page:
Approve the Network Extension Component of the System Extension via MDM
🐝 Kandji configuration
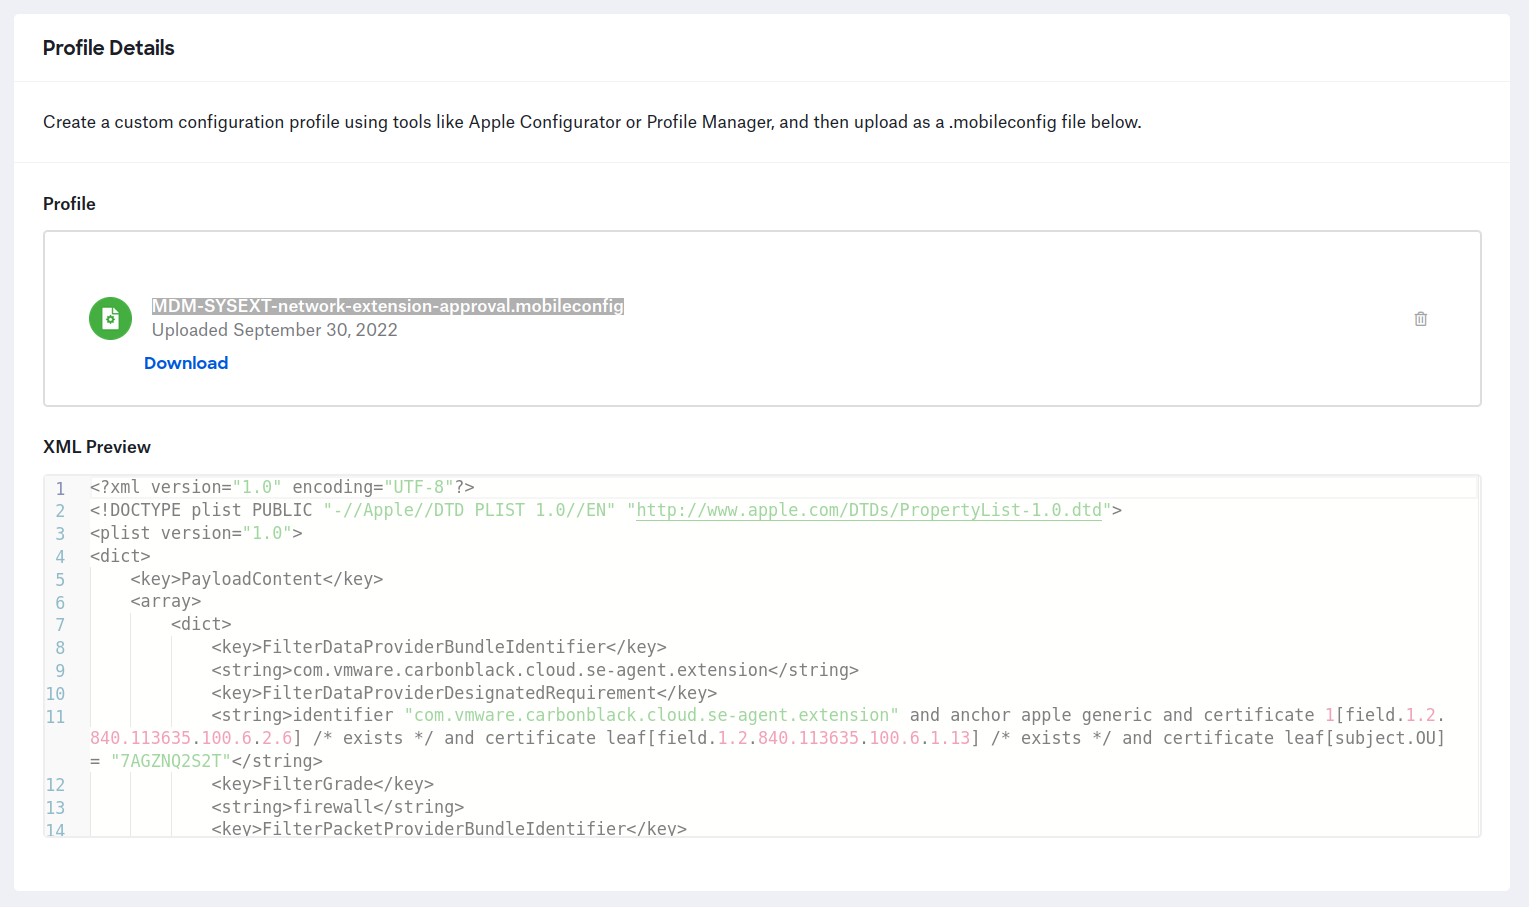
Adding a system extension profile on Kandji, selecting “Allow specific extension types” & checking the “Network extensions” box will NOT work.
You will need to add a custom profile with the right .mobileconfig file to Kandji for the agent to work properly.
You will find this file in the .dmg you can download from the CarbonBlack console.
Open the .dmg on your mac (or use 7zip on Ubuntu), navigate to the /docs folder and locate the MDM-SYSEXT-network-extension-approval.mobileconfig file.
Upload it to your Kandji console, and you’re done.
Full disk access profile
ℹ️ Description
Mac OS 10.14.5 introduced a permission system to tighly control what apps have access to what protected user & app data. Given that CarbonBlack uses both signature & signatureless based detections, it needs to access all the files on the endpoint to run its signatures & ensure maximum protection.
📃 VMware docs reference page:
Grant the 3.51+ Sensor Full Disk Access via MDM
🐝 Kandji configuration
From the Library page, add a Privacy Profile and add an “App Access” for each Bundle ID.

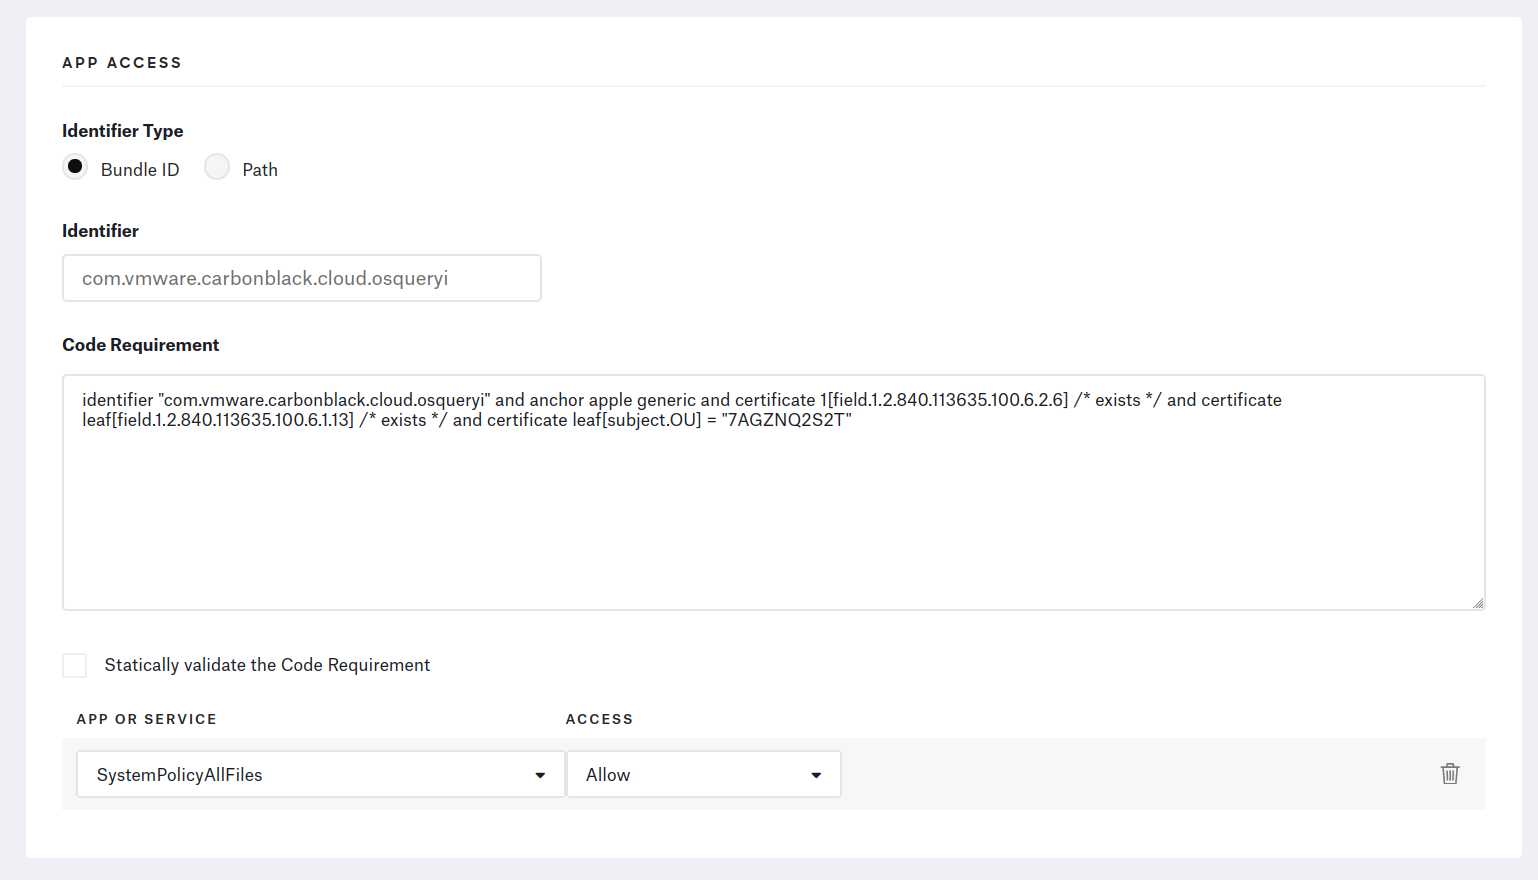
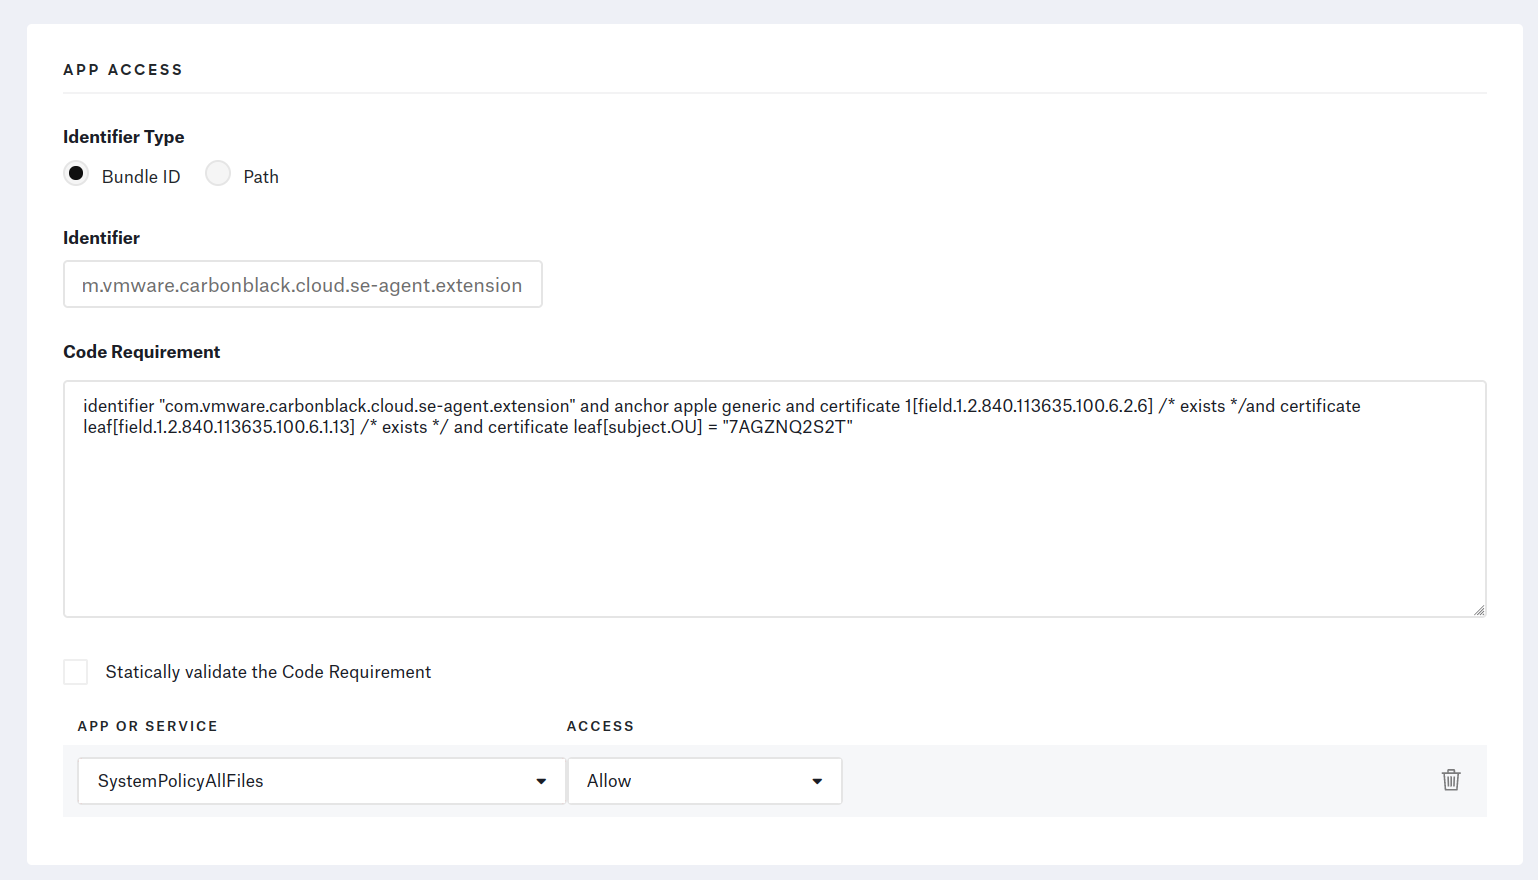


⚠️ Make sure to fill out the Code Requirement text fields with one-liners. The profile’s installation will fail if there are any line-jumps.
EDR agent
ℹ️ Description
Setting all the profiles up correctly makes the deployment fully transparent to the user. Let’s now tackle the installation of the agent itself.
Kandji doesn’t have an Auto App for CarbonBlack, so we will create a Custom App in the library.
Kandji supports 3 ways to install a Custom App:
- 1️⃣
pkgfiles- The
pkgis directly installed as is
- The
- 2️⃣
dmgfiles- Kandji simply looks for the
.appwithin the.dmgand moves it to theApplicationsfolder
- Kandji simply looks for the
- 3️⃣
zipfiles- Kandji extracts the contents of the archive to a given directory
- Thankfully, Kandji allows you to have preinstall & postinstall scripts
When installing CarbonBlack, you’ll need to provide your company code, as well as the endpoint’s group so it can receive the appropriate policies.
As a result, the simple installation methods (pkg & dmg) won’t work for us.
We will go with option 3️⃣.
🐝 Kandji configuration
From the .dmg downloaded from CarbonBlack earlier, extract the following files:
CBCloud Install.pkgcbcloud_install_unattended.sh, located in thedocsfolder
Compress these two files into a zip archive.
Kandji will deploy & extract it to the target endpoints, but that won’t be enough to install the agent.
Add this 👇 presintall script to the Kandji cloud console.
|
|
In the “Unzip Location” text field, type in /tmp/cbi & upload the zip file you have created.
Add this 👇 postinstall script to the Kandji console.
|
|
Make sure to select “Install once per device”. Sensor uninstallation requires a code to succeed, so there is no need to “audit & enforce” using Kandji. Tick the “Restart after successful install” checkbox too.
Knitting it all together
You should now have 4 Kandji library items to manage the CarbonBlack agents on your Mac fleet.
I recommend you don’t add these 4 library elements to your main Kandji blueprint at the same time: during testing, on 2 separate occasions, Kandji deployed the application before the associated profiles. This led to users getting prompts asking them to provide the agent with certain permissions. This is not an ideal scenario.
Currently, there’s no way to create dependency links between library items on Kandji. As such, you have no power over the order in which the items are deployed. Kandji’s support team assured us that profiles are always deployed before applications, yet our experience said otherwise.
So, the best way to deploy CarbonBlack on your entire fleet is to first add the profiles to the blueprint, wait for them to reach all the devices, then roll out the app.
Closing words
Fortunately, the CarbonBlack agent auto-updates on its own, so you won’t have to go through these motions again.
You can regularly update the zip file in the Kandji console, but it’s not necessary.
Let the MDM run its magic and enjoy the automated enrollments on your CarbonBlack cloud console :tada:.